I’m working on creating a chatbot for Discord. Why? Well, in part because I want to, but also I’m trying to figure out if bots can be used to improve instructional delivery in Chemistry. I’ve got a way to go, but I’ve only been at it a week. My bot can’t converse very well, but it can integrate, provide weather forecasts and give you the nutritional information of peanut M&Ms. That’s something, I guess.
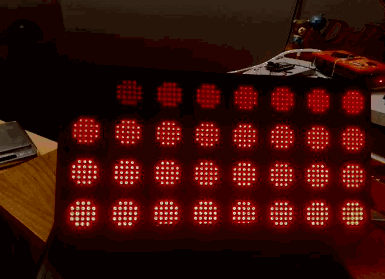
As I mentioned earlier, I just received my first Adabox, and I’ve been having fun getting back into blinky lights (as well as my favorite past time: procrastinating from grading). Now that I’ve gone through most of the tutorials, I am venturing out on my own.
One thing I noticed when playing around with drawing shapes of different colors, is that the default settings for the MatrixPortal resulted in the RGB LEDs being either on or off (essentially). My goal in this exercise it to figure out why that is the case and to find the settings that changed this behavior.
Once I learned how to navigate the documentation, it became clear that the bit_depth parameter was the culprit. It defaults to 2, which means that each color will have 4 different “shades” (my term), inclusive of completely on and completely off. Changing this value to a larger number (max = 6) allows for a deeper gradient.
Here’s the final version of the program I used to work through the problem.
import board # Required
import time
import displayio
from adafruit_display_shapes.circle import Circle
from adafruit_matrixportal.matrixportal import MatrixPortal

matrixportal = MatrixPortal(status_neopixel=board.NEOPIXEL,
    bit_depth=5, debug=False)
display = matrixportal.display

group = displayio.Group(max_size=32)

def makegroup(n):
    global group
    group = displayio.Group(max_size=32)
    s = (8, 2048, 524288)
    for j in range(0,4):
        for i in range(0,8):
            group.append(Circle(i*8+4,4+8*j,2,fill=s[n]*(i+8*j)))

counter = 0

while True:
    makegroup(counter % 3)
    display.show(group)
    counter += 1
    time.sleep(3)
This code creates 32 filled circles on the 64×32 pixel matrix. The circles cycle through the three colors and increase in intensity from 00 (off) to FF (on). Rather than use more human readable (if you are a human that reads HTML color codes) colors, I noticed that a simple linear relationship with an appropriately chosen slope s, allows me to streamline the code.
Once we get to about half intensity (80 in hexadecimal), I have a hard time differentiating the colors. This might be helpful in future designs as it will allow me to back off on power requirements if I don’t need to run the LEDs with high current and deal with image saturation.
Sure, it’s not riveting; however, sometimes you need to work on the basics, and (hopefully) putting those basics to words helps me remember them.
I’m working through some tutorials on how to use the video FX module in Unreal Engine. Here, I’ve outlined a static mesh of my favorite element with glowing embers and added a very rudimentary lens flare.
It should go without saying that I am a fan of incorporating digital fabrication tools into chemistry instruction. A while back, Scott McIndoe and his colleagues published a paper in the Journal of Chemical Education on using laser cut models to teach molecular geometry. At first, it seems counter-intuitive to use a 2D design process to teach 3D topics. On top of that, if you have access to a laser cutter, you probably have access to a 3D printer, so why not just use the 3D printer?
3D printing is great for rapid prototyping; however, when you want to scale up production – say, for example, you want models for a classroom of 100 students – then 3D printing is not a great solution. Laser cutting is one of the fastest, easy-access digital fabrication tools available, and build times can be drastically reduced if a laser-cutter solution is available.
Then again, one needs access to a laser cutter. And that is something I (sadly) do not have at present.
So I took Scott’s design and adapted it to 3D printing. Yes, his paper provides some STLs to print, but if you want to create different sizes, then you have to do some scaling. I wanted a parametric approach, so I resorted to OpenSCAD to recreate his design. The code is below, in case you are interested.
Why would you want to use this? I don’t know, perhaps you want to make super thin molecules or super small molecules. All I know is, now you can.
Now Lego Yoda can teach molecular geometry. I honestly have no idea what to do with a 0.2 mm thick tetrahedral molecule, but now I’ve got one.
/*
Origin: @mcindoe
Reference: https://pubs.acs.org/doi/10.1021/acs.jchemed.8b00553
*/


ca_d = 12; // diameter of central atom
ca_g = 5;  // length of the gap in the central atom
oa_d = 10; // diameter of the outer atom
bond_w = 5; // width of the bond
bond_l = 25; // length of the bond
th = 0.2+3*0.35; // piece thickness (my printer is set to 0.2 mm first layer and 0.35 subsequent layers)
allowance = 0.05; // adjust gap size for tighter/looser fit, YMMV
$fn = 25; // Keeps round parts round

/*
n is the number of bonds (1, 2 or 3).  Setting tet to true will force a 109.5 degree bond angle.  NOTE: you shouldn't call this function, use makepiece
*/
module makebonds(n,tet=false) {
    for(i =[1:n]) {
        rot = tet?125.25+(i-1)*109.5:i*360/(n+1);
        rotate(rot,[0,0,1])
        translate([bond_l,0,0])
        union(){
            circle(d=oa_d);
            translate([-bond_l,-bond_w/2,0])square([bond_l,bond_w]);
        }
    }
}

/*
n is the number of bonds (1-3).  Setting tet to true will force a 109.5 degree bond angle
*/
module makepiece(n,tet=false) {
    rot = (tet && (n==1))?70.5:0;
    linear_extrude(th)difference(){
        union(){
            circle(d=ca_d);
            makebonds(n,tet);
        }
        rotate(rot,[0,0,1])translate([ca_d/2-ca_g,-(th+allowance)/2,0])square([ca_g,th+allowance]);
    }
}

// Example usage
for(i=[ [-10,-20,0], [10,20,0] ]){
    translate(i){
        makepiece(3);
        translate([40,0,0])makepiece(1);
        translate([-40,0,0])makepiece(2);
    }
}