
This is a classic article which I’ve restored from a former version of my website. It has been modified from the original version.
Introduction
I started undergraduate research at Juniata College in my freshman year. I worked with Tom Fisher to develop an inexpensive instrument to perform Anodic Stripping Voltammetry. Now, XX years later (actual numbers removed to protect the innocent), I’m still passionate about undergraduate research, although it’s been a long time since I’ve had the opportunity to build something. Now that we have Raspberry Pis running Wolfram’s Mathematica , I thought it was time to revisit some of my earlier instrument building interests.
My goal here was to build a rudimentary spectrophotometer. I didn’t want anything sophisticated at the moment. Rather, I wanted to demonstrate how the RPi, Mathematica, a few Legos and some simple circuit designs can be used to build an instrument.
Making things manageable
Republishing edit – The comments below refer to the Raspberry Pi Model B. The version 2, with 4 cores, runs Mathematica much more smoothly (although 3D graphics and complex Manipulates are still a stretch). Getting the remote kernel to work well under the recent version of Mathematica (10.x) is also a lot more challenging than it was back with version 9.
As I’ve noted in one of my other blog posts (edit: who knows which one) , Mathematica on the RPi is remarkably slow. Graphics rendering just isn’t ready for prime time at the moment (although honestly, I’m not complaining about running Mathematica for free on a $35 computer). I find that a hybrid approach – using a laptop with a copy of Mathematica on it and setting up a remote kernel connection to the RPi – works quite nicely.
In Mathematica 9 under Evaluation -> Kernel Configuration Options it is possible to add a new kernel. Below is a snapshot of the configuration that I use to connect to my Pi.

I filled in the basic options first before clicking on the advanced options. If you plan on using the hardware interface, it is critical that you launch a kernel with root privileges. Note that in the shell command I added sudo right before wolfram. The first time I executed a command in a notebook accessing this kernel, I was asked a bunch of security questions, to which I answered yes. Once it asked for my Pi password I was good to go.
No point reinventing the wheel
I don’t want this post to turn in to a HOWTO, especially since I suspect the only visitors are my family members and friends whom I begged to visit so that my website hits reaches double digits. Besides, what I’ve done here is largely a culmination of other projects. Here’s the spectrometer:
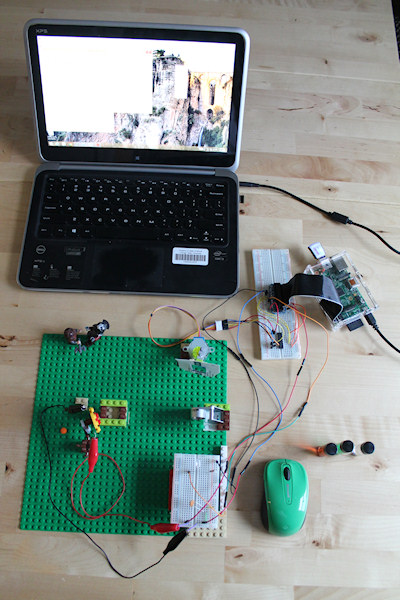
There are a number of folks who have already built spectrometers using Legos as a simple optical bench . The source is a white LED, and lighting LEDS is one of the first projects that folks try with the RPi . The reflective diffraction grating is a piece of a CD that is mounted on a stepper motor. Again, the stepper motor control is based on one of the RPi/GPIO tutorials over at Adafruit, as is the photocell . The lens between the source and the grating is a 10X magnifier lens that I found while rummaging through my junk drawer.
Here are a few more pictures of my setup:

The photoresistor fit very nicely into the bulls eye of a Lego target. I have the target mounted on some movable Legos so I can align it properly.
The sample “chamber” is a bit bigger than the sample; however the brown rounded 1×2 bricks allow me to place the sample in more-or-less the same position each time.
Below is a view of the reflective diffraction grating, which is a piece of CD that is taped into one of my business cards. The white spot towards the bottom of the grating is the LED light after being focused by the lens. The grating is mounted on a 512 step stepper motor with some Legos. In this version, I did not make much effort to position the grating above the axis of the motor, which is something that should be done in the next version of this spectrometer. Finally, to show that the diffraction grating is actually working, here I show the rainbow pattern. You’ll also see my cat, Eowyn, in the background checking to make sure I haven’t made any mistakes.

Data Acquisition and Processing
On the programmatic side, I needed three components: one to control the source, one to control the stepper motor and one to read the photocell. Mathematica allows one access to the GPIO through DeviceWrite, but it is quite slow in its present form, so I fell back to writing some basic C code and using MathLink. I’ve put links to the code at the end of this post for reference purposes, but please work your way through the code before implementing it on your own – I haven’t made any efforts to include debugging or generalization of the code.
With the control modules created in C, only a few Mathematica commands are necessary to create the WolfSpec palette. From here I can turn the source on and off, rotate the grating and perform a scan.

Above you see the WolfSpec control palette along with several results. The black line is the detector response with nothing in the cell chamber; the blue line is water; and the red and green lines are the responses for the red and green solutions, respectively.
So the good news is that I can actually discriminate between the three solutions. The resolution is very poor because my stepper motor gives at most 32 points across the spectrum. The data are pretty noisy as well because I’m not using an analog-to-digital converter for reading the photocell. There are many areas where this project can be improved. Perhaps, if you happen to be one of the rare visitors to my website who aren’t family members, you can take away a few ideas and make a science fair project out of this.
Code
Here are links to the C and Mathematica code I used to get WolfSpec up and running. I’ll repeat my caveat from above: this code is not tested and debugged very thoroughly, so don’t just cut and paste.
- C program which uses the WiringPi library
- Template for MathLink
- Sample notebook
Hello
This is really nice artical ^^
I would be happy if I could get the full HOWTO process :)?
Thanks and have a great day ^^
Thanks Jan. This is one of my classic articles, which I restored after having some problems with the old version of my website. I suggest taking a look at the code links at the bottom of the page. I do plan on revisiting this project, and will update it with a more thorough howto section.